Pages

Pages

Monday, October 28, 2019

Mixed Media Monogram II


Mixed Media Monogram II 

Hi Friends
sharing the results of yet another demo at ItsyBitsy store in Lajpat nagar , New Delhi.....

Mixed Media Monogram II 
 Using a variety of supplies from the store...... Paper Mache Decor Alphabets, Chipboards, Black Gesso , Clear Gesso, White Gesso, Grainy texture paste, Silicon Moulds, waxes, silicon Glue, Air Dry Clay, Glitter Balls, Mica Flakes..........
Mixed Media Monogram II 

Mixed Media Monogram II 

Mixed Media Monogram II 

Mixed Media Monogram II 

Mixed Media Monogram II 

Mixed Media Monogram II 


Please do leave your comments. I would love to read what you say and I would love to visit your blog too !!

Monday, October 14, 2019

Mixed Media Monograms

Mixed Media Monograms 

Hi Friends, 

Add caption
I had another lovely Demo session to create Mixed Media Monograms at Itsy bitsy , Pitampura, Delhi Store on 12th Oct 2019 and created two monograms 
Mixed Media Monograms

sharing some pics here............the supplies from the store, Paper Mache Decor Alphabets, Chipboards, Black Gesso , Clear Gesso, White Gesso, Grainy texture paste, Silicon Moulds, waxes, silicon Glue, Air Dry Clay, Glitter Balls, Mica Flakes..........


 I find the live connect and interaction at workshops and Demos so invigorating and full of creative energy.....It was such an enjoyable experience, thank you Rashmi Harish and Itsy Bitsy/ Little Birdie for this wonderful opportunity and Theresa Francis for all the coordination , The youngest participant Vivaan was adorable and he bought his initial letter v to try and make for his room .........

thank you so much for your visit to my blog today, please do leave your comments. I would love to read what you say and I would love to visit your blog too !!

Tuesday, September 24, 2019

' Life Is Beautiful' Mixed Media demo for Little Birdie


Hi Friends

' Life Is Beautiful' Mixed Media demo, Itsy Bitsy Store, Lajpat Nagar , New Delhi


' Life Is Beautiful' Mixed Media demo, Itsy Bitsy Store, Pitam Pura , New Delhi

I recently did few demo classes for Indian Brand Itsy Bitsy and Little Birdie Mixed Media range at their Delhi stores. It was great fun teaching and explaining about the Little Birdie Mixed Media products to some wonderful crafting enthusiasts.....

' Life Is Beautiful' Mixed Media demo, Itsy Bitsy Store, Pitampura, New Delhi
 with the ever helpful staff at Itsy Bitsy , Pitam Pura Store in Delhi.........
' Life Is Beautiful' Mixed Media demo, Itsy Bitsy Store, Pitampura, New Delhi
Using the awesome Gold Alcohol Splash..........
' Life Is Beautiful' Mixed Media demo, Itsy Bitsy Store, Pitampura, New Delhi

' Life Is Beautiful' Mixed Media demo, Itsy Bitsy Store, Pitampura, New Delhi

' Life Is Beautiful' Mixed Media demo, Itsy Bitsy Store, Pitampura, New Delhi

After dry brushing all textures with White Gesso, creating a composition with Cheese Cloth  and Craft brown paper cylinders painted with white Gesso  ..........

'' Life Is Beautiful' Mixed Media demo, Itsy Bitsy Store, Pitampura, New Delhi

' Life Is Beautiful' Mixed Media demo, Itsy Bitsy Store, Pitampura, New Delhi

final touches and arrangement with Primed Chipboards , Craft Pellets , sea-shells, Heavy and Soft Gel Mediums, Frozen berry Twinkle melange  and some fine glitter and die cuts..........


' Life Is Beautiful' Mixed Media demo, Itsy Bitsy Store, Pitampura, New Delhi

' Life Is Beautiful' Mixed Media demo, Itsy Bitsy Store, Pitampura, New Delhi


 ....and the one on the following picture was done at the Itsy Bitsy Second store at lajpat Nagar , New Delhi...........
' Life Is Beautiful' Mixed Media demo, Itsy Bitsy Store, Lajpat Nagar, New Delhi
I do hope you like this project, I find the live connect and interaction at workshops and Demos so invigorating and full of creative energy.....It was such an enjoyable experience, thank you Rashmi Harish and Itsy Bitsy / Little birdie Brand for this wonderful opportunity.........

Please do leave your comments. I would love to read what you say and I would love to visit your blog too !!

Saturday, September 14, 2019

Get More out of your Stamps ....handmade embellishments


Clay and stamps ....handmade embellishments 
Hi Friends
just a quick idea to get more out of your stamps.......this is air dry clay, roll out thin sheets, you can cut them into different shapes and punch tiny holes on one or both sides for ribbons or twine to pass before the clay is dry.....stamp with any stamps you may have......I had this clay in black but both black and white work.....color with metallic waxes , they will work best on black. For white clay, spray with inks and highlight textures with gesso or waxes....

Clay and stamps ....handmade embellishments 
You can use Alphabet stamps or sentiment stamps and use some texture stamps randomly to create some unique labels , hangings etc....or create focal elements on your mixed media creations ......

Clay and stamps ....handmade embellishments 

Clay and stamps ....handmade embellishments 
hope you find this small idea useful and you have your own unique embellishments to go with Art :)

Please do leave your comments. I would love to read what you say and I would love to visit your blog too !!

Wednesday, August 28, 2019

Decoupage Tray


Hi Friends 
I created a Decoupaged tray with some supplies from Kraft Culture and Itsy Bitsy . I have used the decoupage papers from Kraft Culture. These are 100 gsm Matte papers and come in a set of six designs of A4 size . This design is from the set Vintage Beauty and these special decoupage papers are very reasonably priced. 


Have used Little Birdie Chalk paint Passionate Plum( for the sides ) and Snow ( for the base and for stenciling) from Itsy Bitsy. Used  Deco Magic Glue matte  also from Itsy Bitsy . edges are highlighted with Golden Glaze metallic paint . Sealed everything with three coats of Decor Varnish Gloss, have sprinkled some mini pearls on the inside edges of the tray. 


Please do leave your comments. I would love to read what you say and I would love to visit your blog too !!

Monday, August 5, 2019

Reverse Decou-Page with DecoArt Tutorial

Reverse Decou-Page with DecoArt supplies Tutorial

Hi friends
I am back on my blog after a long gap ....hope you missed me some :) I am sharing a Reverse decoupage glass plate made with the awesome DecoArt supplies 
Reverse Decou-Page with DecoArt supplies Tutorial

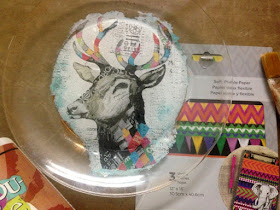
I started with a 9" glass plate and using Americana Decou-Page Matte  applied the Paper Napkin on the reverse side of the glass Plate .... allow to dry and then apply another coat of  Americana Decou-Page Matte  on the paper napkin. after that was dry I applied DecoArt Media White Gesso on the decou-paged surface at the back of the plate........
Reverse Decou-Page with DecoArt supplies Tutorial

I then selected a paper from the Tribal set of Specialty Decou-Page papers from DecoArt Americana Decou-Page Paper is significantly thinner than most decoupage papers and delivers an almost seamless finish. Extremely soft, durable, pliable, and workable, this special paper weight is so simple to use. It easily wraps around corners, eliminates creases and wrinkles. This comes in three coordinating pattern sheets per package ( Each sheet measures 12"x16" per package).
Reverse Decou-Page with DecoArt supplies Tutorial

I selected the paper and cut according to the size and shape of the plate and dry fitted to see position at the back of decoupaged surface.
Reverse Decou-Page with DecoArt supplies Tutorial

 Using the DecoArt Dimensional metallic paint in Gold and Andy Skinner Mixed Media Stencil Tornado  stencilled on the Decou-page paper.....

Reverse Decou-Page with DecoArt supplies Tutorial
After the Metallic texture paint is dry cut little slits on the inside circle of decou-Page paper so that it fits well on the curved surface of the glass plate. Decoupage on the reverse side of the plate using Americana Decou-Page Matte , after the glue dries completely, sand the excess paper with a fine grit sandpaper....
Reverse Decou-Page with DecoArt supplies Tutorial

Reverse Decou-Page with DecoArt supplies Tutorial

Reverse Decou-Page with DecoArt supplies Tutorial

Reverse Decou-Page with DecoArt supplies Tutorial

Seal the back of the plate completely with Americana Decou-Page Matte  and after drying finish the back with a coat of Media Gesso in Black or white or Gold metallic. You need to give an opaque coating at the back as the Decou-Page papers are translucent . 

I do hope you like this project and try your hand at reverse decoupage......

Please do leave your comments. I would love to read what you say and I would love to visit your blog too !!