Sunday, May 31, 2015

A card for DCWV

Last post for today.....sharing a card for the DCWV May challenge, I have used paper from the DCWV Steampunk Botanica stack .........


The little birdie is paper pieced from the same stack, sentiment is a Tim Holtz's stamp. The flowers are handmade using Cherry Lynn die, these have been inked by distress inks, shaped and center embellished by chunky Glitter. The smaller flowers are punched out of scraps from the same stack and a flat back pearl adorns the centre, Clockface is fussy cut from the same stack and the flourish is another die cut by Spellbinder.


Here is a closer look............


Please do leave your comments. I would love to read what you say and I would love to visit your blog too !!

An Inky Bookmark

 Hi
third post from me today, playing catch-up on the last day of the month :)

I made this bookmark for the Rubber Dance Art Stamps May Challenge. I cut some canvas and used Gesso on it. Played with the Camel Photo inks in various shades to get my background. Stamped with white color box ink and a Maya Road stamp.


I painted a portion of my bookmark with white acrylic color to create space for my stamped flower and colored the flower with thinned silk acrylic glazes by ColourArte in Apple blossom, Sea Spray and Kiwi. I mixed these and added a bit of black to Kiwi to get a darker shade of green . Added a multi-colored wool thread with few beads. The flower is stamped with Stampendous Rubber stamp


Actually I was working on two bookmarks but the stamping went wrong on the second one...but still sharing the second one too ( Bibi, that is NOT my entry for the challenge please hehe)  !!


This is the lovely color theme and the optional theme of flowers for the challenge 
Also linking to http://mixedmediamc.blogspot.in/2015/05/mixed-media-monthly-challenge-12-may.html, was inspired by the lovely colors and flowers in the  pic 


Please do leave your comments. I would love to read what you say and I would love to visit your blog too !!

Crazy Cupcakes Anyone !!!

Hi Friends

sharing a  mixed media layout


I do not have any WIP pics, the following pic( Bad pic, pl excuse) shows the piece after some texture, color and stamping has been added. I created texture by randomly making some design by dripping white glue straight from the bottle and letting it dry. I have then sprayed with mists made out of artist quality watercolors and stamping with archival black. The butterfly is from Tim holtz Tissue wrap- Melange and adhered with Gel medium.

The following is a better pic.....I have recycled a waste card stock paper which had some ugly scribbles on the other side.Next pic shows the back side when I was attaching it with the double sided tape to another piece of salvaged textured paper (seen below) to strengthen my base.


 so the recycled part is this....


.......here come more layers of colors and more stamping and Tissue wrap.....the sentiment is computer generated and colored with distress inks.


my butterfly gets a touch of color and glamour with the awesome shimmery ColourArte Silk Acrylic Glazes........

The cupcakes are free images from the net,re-sized and printed on laser printer on white card stock, fussy cut , layered, stamped and colored........ do you see the texture here..........


What if I tell you that these are real sprinkles on these cup cakes ?? well mad as it sounds,this is true !! The cupcakes have been textured with white glue and texture paste 'Icing' and 'real sprinkles'. After these dried completely, have sprayed with two coats of spray varnish to seal the sweet sprinkles.......so as to avoid any visits from my small friends from the insect world to come 'taste' my painting !!


 added both the cup cakes with foam tape for some more dimension.... the sprinkles got a final light brush of silver mica powder to really make them shine .........


I do hope you like my adventures in Mixed Media, I can tell you, I am having some good fun !!
linking to 
http://lessology.blogspot.sg/2015/05/lessology-challenge47-lets-have-cupcake.html

http://www.unrulypaperarts.com/2015/05/may-2015-readers-art-quest.html

http://cosmicstrawberry-colette.blogspot.in/2015/05/cosmic-colours-challenge-13.html?utm_source=feedburner&utm_medium=feed&utm_campaign=Cosmic+Strawberry


Please do leave your comments. I would love to read what you say and I would love to visit your blog too !!

Smile......

Hi Friends

want to share a Mixed Media card with you today.........


I started with a watercolor card stock panel and used about all the colors of the rainbow on it. I have used Camel Transparent  photo Colors for this. this is followed by some rubber stamping with archival ink in black and then stenciling with homemade texture paste and a Prima Stencil. 


The sentiment is handwritten with a red Camel paint pen over all that yummy texture, white dots are added with White Uni-ball Signo Gel pen and glossy accents are added on top of the sentiment for some dimension ......a closer look ...........


The panel is cut at an angle and mounted on red card stock and a rose strip punched using Ek Success punch is cut out of Vellum and attached under the panel. A bit of bling to finish off.........


Hope you like it , linking to......
http://blog.kraftzone.in/2015/05/summer-splash-cards-challenge15.html- used practically all the colors in the mood board and roses


Please do leave your comments. I love to read what you say and appreciate the time taken to leave a feedback !!

Wednesday, May 27, 2015

Shades of Blue....Trash to Treasure

Hi friends

just some random 10 minutes recycled crafts with my most favorite glass paints,stencils and some bits and pieces. I am entering this to PaperArtsy Challenge : Bottles. I was inspired by the challenge announcement post here and the bottles painted with the paint inside the bottle in shades of blue.


The glass paints are on the inside of this recycled Adidas perfume bottle ( pic from internet ).......I  broke the tip of the bottle and sealed edges with some epoxy resin ( Shilpkar) 


The leaves are also made with epoxy resin and colored with three shades of Hobby Ideas Glass colors and the edges sanded lightly to reveal the base. 


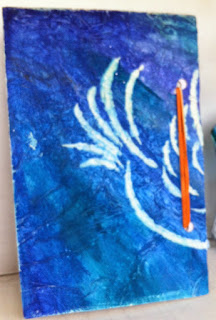
This is a small notebook ( 16 cm x 12 cm )made out of a mixed media page using wrinkled tissue paper on the base and shades of blue and green inks sprayed randomly.The bird is stenciled using homemade texture paste.......the inside pages are recycled notebook pages salvaged from the last year school notebooks of my son. These are cut to size, folded and holes are punched. Binding is a cute 7.5 cm paper clip and a big rubber band !! The front......

and the back...................


This is another one recycling a cardboard piece, a die cut, a sentiment torn out of an old desk calender and the giraffe sticker borrowed from my son

here is the back which I love, I penciled a simple design and cut using a paper cutter, a paper pad is glued inside.


Make your own Pad of Paper : I want to share with you a simple way to recycle paper which is especially useful if you have unused notebook pages in your kids school notebooks at the end of the academic session.  It is very easy to make in about 5 minutes. I do not have any pics of it but you need to 

1. Cut paper to size and stack
2. Clip the paper together with a binder clip on either side near the top
3. Add a generous amount of  white glue on the top of all the pages and let dry.

This is such a functional idea as you can use this to make small notebooks to slip into bags, sketch pads and notepads. In fact my sons likes these pads a lot and does all his rough /practice work on these pads !!

A final look at my set of three in blue !! Happy recycling !! 


linking to 


Please do leave your comments. I would love to read what you say and I would love to visit your blog too !!

Tuesday, May 26, 2015

Textured Painting .....Trash to Treasure

Hi Friends

sharing a Textured painting with you using some spare piece of wooden board and Wall putty !!


Started with a piece of 8'x8' piece of wooden board (left after some home renovation ) and gave two coats of wood primer. Mixed the wall putty with some fevicol MR and add water to it. the consistency should be that of texture paste. You can use china clay ( available easily in craft stores) or some ready wall compound also for this ). Spread the paste on the primed surface in a thickness of about 3-5 mm and create texture using any household objects like lids, pen caps , stamps etc.I have used my wooden blocks to stamp designs in wet clay. Take care to wet your stamps before stamping and wash the stamps immediately or put the stamps in water till you are finished mark making. This is how it looked after stamping, leave to dry well for at least 24 hrs.


Give two coats of Acrylic Gloss medium ( I used Camlin),  drying in between layers, you can see the gloss on the piece in the following picture after the gloss medium has been added. Now to build layers of colors, Used Cadmium Yellow Medium and cadmium Lemon and hand rubbed with a little water. Smooth with a paper towel and rub off with a cotton cloth to retain some areas with the base color. Paint with another layer of Gloss medium after the yellow dries completely and let gloss medium dry too .


This is after adding a layer of Permanent rose and Magenta on the yellow !! repeat all the steps  ie hand rub colors, smooth with paper towel, take color off with a cotton cloth to reveal base layer and yellow layer from certain areas and after drying give a coating of Gloss medium.


here you can see the layers............


I gave some additional layers with Phthalo Blue and Black and deep green and repeated the steps, The last layer was a wash of Black acrylic. And then it was time for some magic with the fabulous silk acrylic glazes by ColorArte.


a top layer of dry brushed silks in various colors brought a lot of glamour to this piece........

some close-ups ..........
a touch of stickles to the butterflies and peacocks..............


a bit of bling in the four corners..............
and a layer of Varnish later.............


Please do leave your comments. I would love to read what you say and I would love to visit your blog too !!
Related Posts Plugin for WordPress, Blogger...

LinkWithin

Related Posts Plugin for WordPress, Blogger...