Sunday, January 29, 2017

A Purple Valentine card with DCWV


A Purple Valentine card with DCWV


A Purple Valentine card with DCWV
I have made this Purple
( hehe....why not ???) Valentine card  with the Blue China stack from DCWV. It has beautiful double-sided paper and die-cut sheets in wonderful designs.

I layered both sides of this pattern paper with a self design on one side and a floral pattern on the other side, made a Dahlia Fold flower for the focus with a beautiful purple rhinestone centre.......the sentiment is cut from a sheet from the same stack..... 
A Purple Valentine card with DCWV
The beautiful die cut design is also from the same Blue China Stack,have added some tiny pearls from my stash..............love the dimension on this ....
A Purple Valentine card with DCWV

I am linking this card to January DCWV Stack-o-holic Challenge  using the sketch below

I do hope you like this Valentine card in an unusual color combination.........


Please do leave your comments. I would love to read what you say and I would love to visit your blog too !!

Thanks card with DCWV

Thanks card with DCWV

Thanks card with DCWV
Recently I got my prize pack from DCWV Inc. Three latest releases .....beautiful PREMIUM Stacks....Letters From Home, Blue China, Copper Luxury, Double sided card stock and die cut sheets.......

I have made this thank you card with the Copper Luxury stack. It has beautiful double-sided paper in water color patterns. I have fussy cut and used the pattern papers in layers on the card, also distressed edges. 

Thanks card with DCWV


I am linking this card to January DCWV Stack-o-holic Challenge  using the sketch below, I have flipped the design horizontally 


Please do leave your comments. I would love to read what you say and I would love to visit your blog too !!

Sunday, January 22, 2017

Royal Tea Pot for ColourArte


Royal Tea Pot for ColourArte
 Hi Friends

sharing a Royal Tea Pot created for my design team post for ColourArte. This is a transformed/altered /upcycled project using Paverpol and the amazing ColourArte Iridescent Silks ............

Royal Tea Pot for ColourArte

Royal Tea Pot for ColourArte
For the full post and tutorial please visit ColourArte Blog here 
Many thanks for your visit today, please do leave your feedback!!


Thursday, January 19, 2017

Patina Effect in three simple steps


Hello Friends....
Today I want to show you how to create a Patina Effect in three easy steps. I made this Antique Patina Effect Altered Box for my DT post for Itsy Bitsy. For the international peeps, Itsy Bitsy is India's Joann's or Michaels :) .It is India's biggest and fastest growing Hobby, Arts and Crafts store chain with an impressive online and onsite presence with 18 Brick & Mortar stores and a very user-friendly e-commerce site as well.

Patina Effect in three simple steps 

started out with this beautiful Wooden Alterable box from the store. Made of real light weight wood these boxes are perfect for storage, decoupage, painting, stencil art, decoration and are great for gifting to family & friends.

Patina Effect in three simple steps 

I decided to give the box the antique patina effect using Mont Morte Black Gesso and the Pearlised Metallic Paints in Brick Red, Gold and Teal Blast...

Here are the steps to follow : 

I gave a coat of Mont Marte White Gesso to the Box to prime the wooden surface. Wood being a porous surface needs a Primer to prepare it for paints and sprays. Let dry. You can also use one of the pre-primed boxes as your base. 

1. Stencil design with Mont Marte Modeling Paste and Lattice Stencil by Itsy Bitsy , added some more texture with another stencil. Let dry. 

2.Paint all over with Mont Marte Black Gesso, cover completely and let dry. The black gesso makes the pearlised colors really pop !!

3. Dry brush the Pearlised Metallic paints in Brick Red, Teal Delight and Gold. There are few tips and tricks you should keep in mind when you use this technique

Some tips for Dry Brushing Technique :
1. Dry brushing technique involves using a paint brush that has a minimum amount of paint on it and using it to highlight textures and edges.
2. It is best to use a flat brush for this technique.
3. Keep your brush at a 90 degree angle and lightly brush edges or raised areas. Start with a light touch and gradually build color/layers.
4. The secret to this technique is not to apply too much paint on your brush, it is a good idea to keep a spare paper on which you wipe your brush after taking paint on it before starting on your textured surface.
The Pearlised metallic paints are opaque in nature so it is important to build the color in layers with very light strokes of a dry brush otherwise you will miss the contrast with the Black Gesso. In case you feel that your color layers are too thick, simply cover again with a coat of Black Gesso and start again.

This is the box after black Gesso and the color layers........
Patina Effect in three simple steps 

Patina Effect in three simple steps 

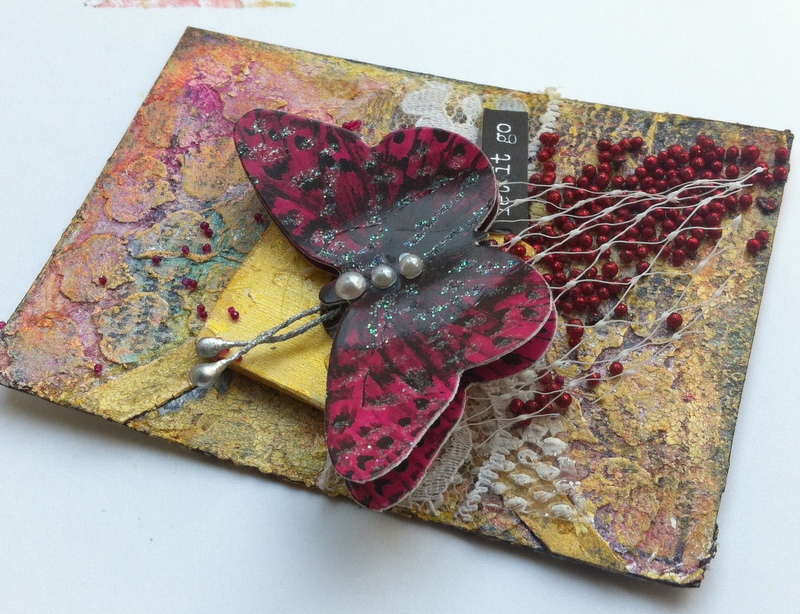
To embellish the box , I used a Sizzix weathered clock die cut, a brad, some metal bits and glass beads. I layered two diecuts cutout from thick card stock and painted with the same paints randomly. Added the clock hands to some metal charms using a brad, added the metal corners and beads with Silicon Glue ..........
Patina Effect in three simple steps 

The clock face and hands are added with little cardboard pieces below to give dimension.........

Patina Effect in three simple steps 

Patina Effect in three simple steps 

You can see some more pictures on the Itsy Bitsy Blog here. 


A Vintage Journey  Challenge Theme : Going Round in Circles


Please do leave your comments. I would love to read what you say and I would love to visit your blog too !!

Saturday, January 14, 2017

Happy 2017....a Desk Calendar cum Photo Frame Tutorial

Desk Calendar cum Photo Frame Tutorial
 Hi Friends

I am happy to share with you my first design team project made for Itsy BitsyIndia's biggest and fastest growing Hobby, Arts and Crafts store with an impressive online and onsite presence. 

Here are the pictures of my project, this has a desk calendar on one side and a photo frame on the other side......

The Desk Calendar...............
Desk Calendar cum Photo Frame Tutorial
 The Photo Frame.........
Desk Calendar cum Photo Frame Tutorial

Desk Calendar cum Photo Frame Tutorial

Desk Calendar cum Photo Frame Tutorial
Please  visit Itsy Bitsy blog here for a full tutorial including for constructing a base.

Linking to :
A Vintage Journey Challenge Theme : Going Round in Circles, used the irregular dots stencil for the background and circular chipboard embellishments 

Mixed Media Monthly Challenge #32 - Put a Stencil on It


Please do leave your comments. I would love to read what you say and I would love to visit your blog too !!

Wednesday, January 11, 2017

Water Color Art Journal

Water Color Art Journal

Hi Friends
sharing a simple Water Color page in my handmade journal. I have used Camlin artist quality watercolors here. no stamps or drawing, straight brush to paper....some texture stamping with archival ink......


Water Color Art Journal

Water Color Art Journal
The sentiment is stamped on tissue paper with simple wooden alphabet stamps and Black Archival ink.........

Water Color Art Journal
If you want to see some other simple watercolor pages , please click here and here

Please do leave your comments. I would love to read what you say and I would love to visit your blog too !!

Sunday, January 8, 2017

Stay Curious ATC set for ColourArte


Stay Curious ATC set for ColourArte
BLESSED are the CURIOUS for they shall have ADVENTURES.....so Stay Curious friends.............sharing a set of ATCs made for my post at ColourArte......

`I cut the watercolor sheet into ATC size after drying and stenciled design with Modeling Paste…..


Stay Curious ATC set for ColourArte


Stay Curious ATC set for ColourArte

Stay Curious ATC set for ColourArte

Stay Curious ATC set for ColourArte
Please click here to see the tutorial on the ColourArte blog here

Mixed Media Monthly Challenge #32 - Put a Stencil on It


Please do leave your comments. I would love to read what you say and I would love to visit your blog too !!

Tuesday, January 3, 2017

The 10-minute Art Challenge


Quick Art Journal

Hi Friends

another page in my small handmade journal, this is for the fun 10 minute Art Challenge by the amazingly creative artist Marta Lapkowska.

Quick Art Journal

The journal page had some doodled leaves with a metallic pen which I had done sometime back. I added some watercolors randomly, added some rub-ons, text stamping with archival ink, a Tim Holtz sentiment sticker and some bird and butterfly stickers, added half a doily to make the bird pop !! 

Quick Art Journal


Happy to have a bit of fun within the 10 minutes :) 

Please do leave your comments. I would love to read what you say and I would love to visit your blog too !!

Monday, January 2, 2017

Acrylics and Ink Sprays

Acrylics and Ink Sprays in Art Journal
Hi Friends
just playing with Acrylics and Ink Sprays in my handmade Journal..........

Acrylics and Ink Sprays

added Gesso, some die cut flowers, the butterfly is a Heartfelt creations die cut. There are lots of layers of texture , metallic paints and lastly ink sprays. I liked the effect of sprays on the metallic acrylic paints as it kind of created a harmony in the color layers and also brought contrast, depth and shadows. The butterfly is a shaped Heartfelt Creations butterfly from Botanical Wings Die set with a salvaged zipper.  

Please do leave your comments. I would love to read what you say and I would love to visit your blog too !!
Related Posts Plugin for WordPress, Blogger...

LinkWithin

Related Posts Plugin for WordPress, Blogger...